Tominer Firmware Usage Tutorial
If the original firmware version of the miner is from before February 2024, you can batch install the Tominer firmware online. For firmware from after February 2024, such as models like the S21 series, L9, S19Kpro, S19xp+hyd, etc., you need to use the rollback firmware downloaded from the Tominer official website to perform an SD card rollback before you can batch flash and uninstall online.
Firmware Installation
-
1
Download and configure the Tominer management software
Download the self-developed miner management software HashcoreToolkit from Tominer. Open HashcoreToolkit, click "New Group", enter the group name and group description, input the miner IP range, then click "Save and Scan" to find the miners to be upgraded.
-
2
Confirm the miner model and control board model
Check the model of the miner to be upgraded and the model of the control board. The control board models include xil, aml, bb, cv, etc. Do not select the wrong one.
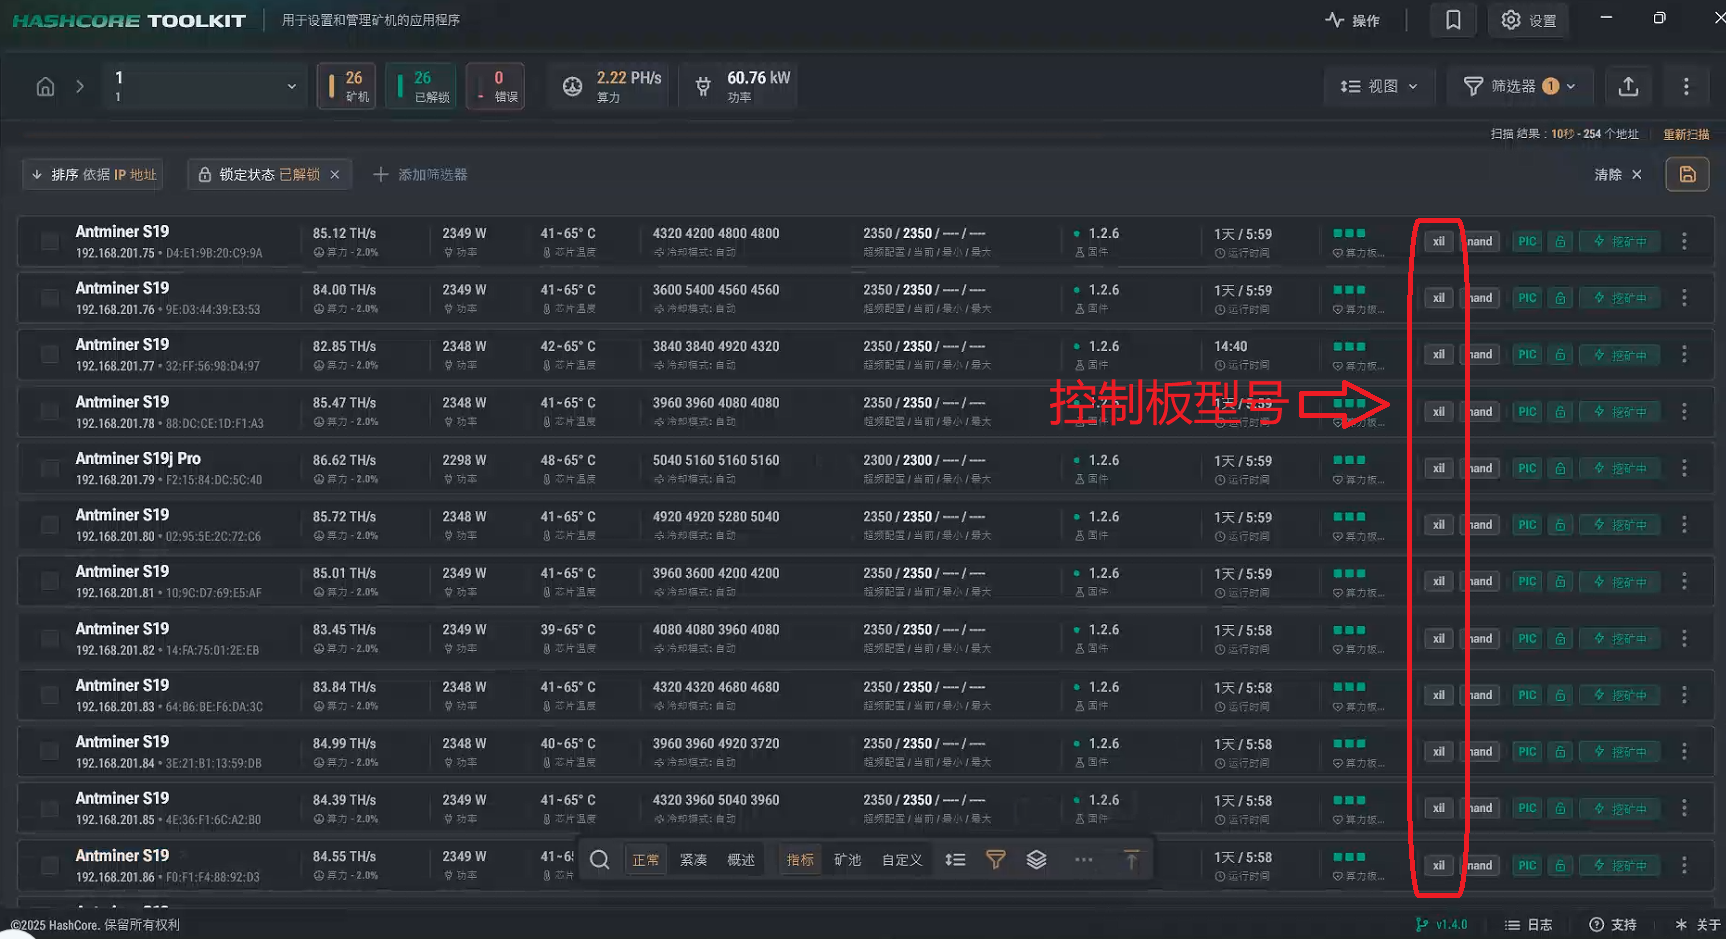
Example of identifying miner model and control board model
-
3
Download the corresponding firmware
Visit the official website, find the corresponding miner model and control board on the firmware download page, then download the corresponding firmware. Remember, do not make a mistake, otherwise the upgrade will fail.
-
4
Prepare the firmware file
After downloading the firmware, place it in an English-named folder. Only one firmware file can be placed in the folder each time. For example, when installing new firmware, upgrading firmware, or using firmware for different models, only one firmware file is allowed. When installing firmware for the next model of miner, you can cut the previous firmware and place it aside.
-
5
Install the firmware
Check the miners that need to be upgraded, click "All Teams", click "Install Firmware", select the folder where the firmware is stored, fill in the firmware version name as "tominer", fill in the version number as "1.2.6", then click "Install Firmware" to complete the firmware installation.
Batch Modify Mining Pools
-
1
Select and configure miners
Check the machines for which you want to modify the miner name or mining pool, click "All Teams", then click "Change Mining Pool".
-
2
Set the miner name
Enter the miner name + IP segment number command in the miner name field. For example: tominer.{ip3}x{ip4}, which will make the miner name suffix tominer.8X102, meaning the machine with segment 8 and number 102. You can use the "+" sign next to it to quickly fill in the IP command.
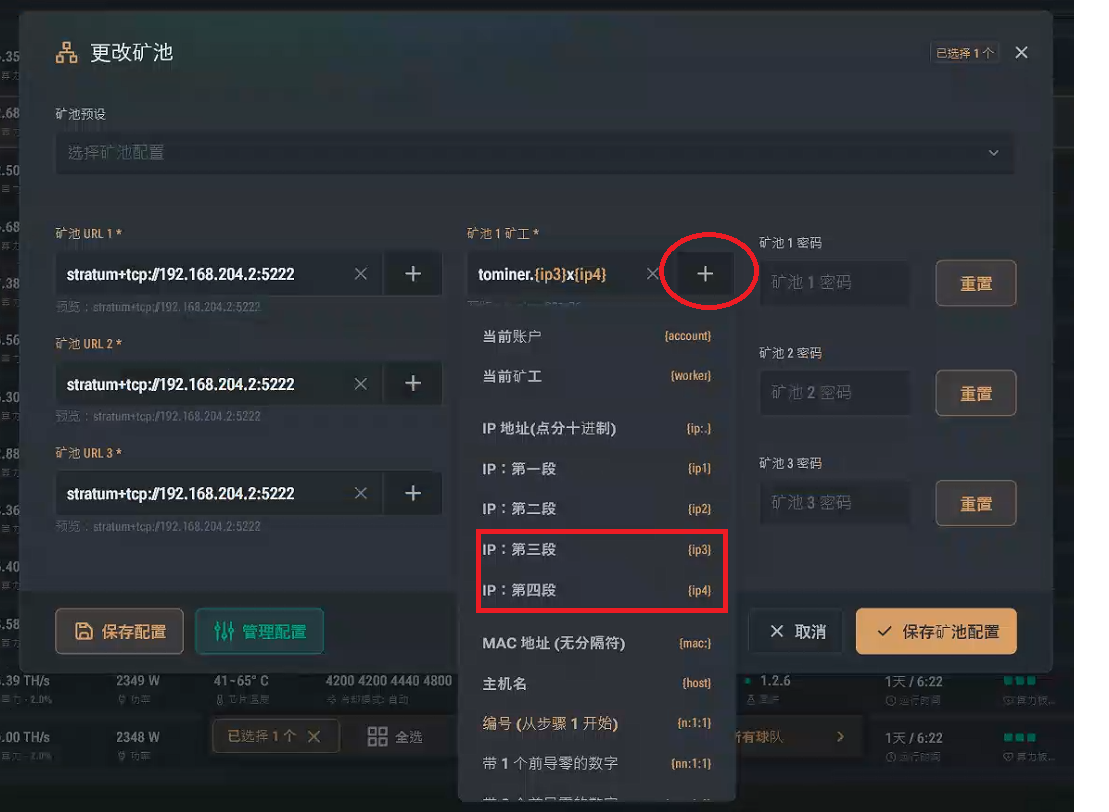
Example of mining pool settings interface
Mining Pool Configuration Instructions
- Mining pool URL format: stratum+tcp://[mining pool IP]:[port]
- Miner name supports IP variables: {ip3} represents the third segment of the IP, {ip4} represents the fourth segment of the IP
- The password can usually be left blank or use the default value "x"
Overclocking and Underclocking Settings & Batch Overclocking/Underclocking
-
1
Unlock miner settings
Open the backend of a miner, click the unlock button in the upper right corner, enter the default admin password to unlock the miner settings. After unlocking, "Mining Settings" and "System Settings" will appear in the right navigation bar of the backend.
-
2
Adjust frequency settings
Click "Mining Settings", then click "Performance", select "Preset", choose the configuration for overclocking or underclocking, save the changes in the upper right corner. After restarting the miner, the system will automatically adjust the frequency. Do not power off during the entire process. It will take about 1-2 hours for the miner to complete the adjustment, and the text in the lower right corner will change from "Auto Adjusting" to "Mining". At this point, the automatic frequency adjustment is completed.
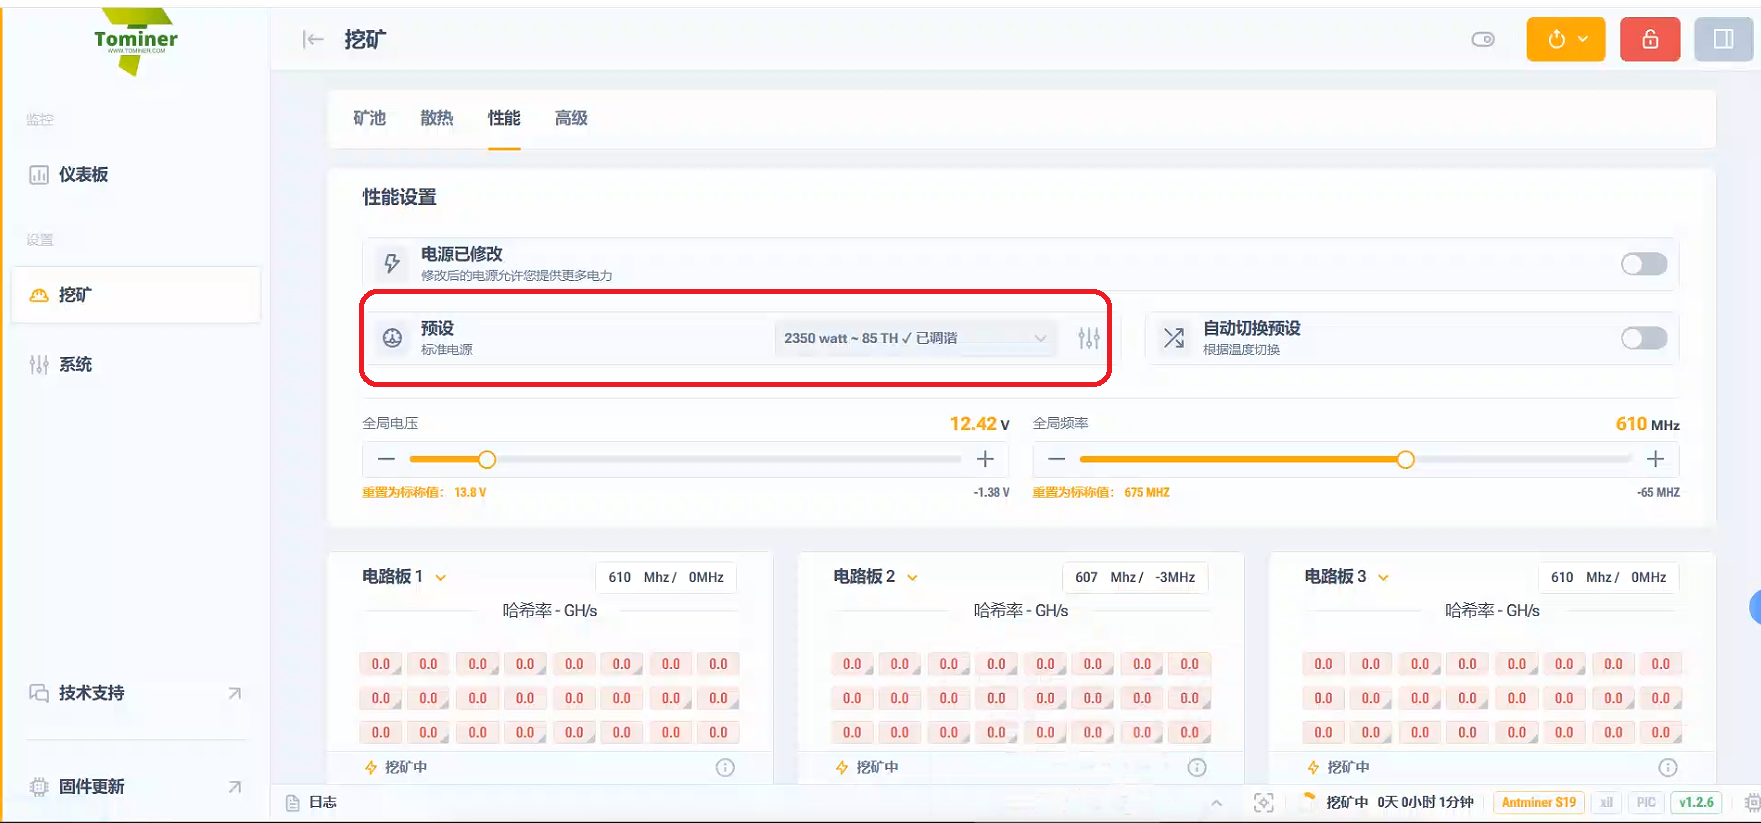
Example of performance settings interface
-
3
Batch configure frequency
After setting the desired frequency, find the machine with the configured frequency in the HashcoreToolkit software, click the three dots on the right side of the interface, then click "Clone". Then check the machines that need to have the same frequency cloned and click the "Clone" button below to实现批量配置频率功能。
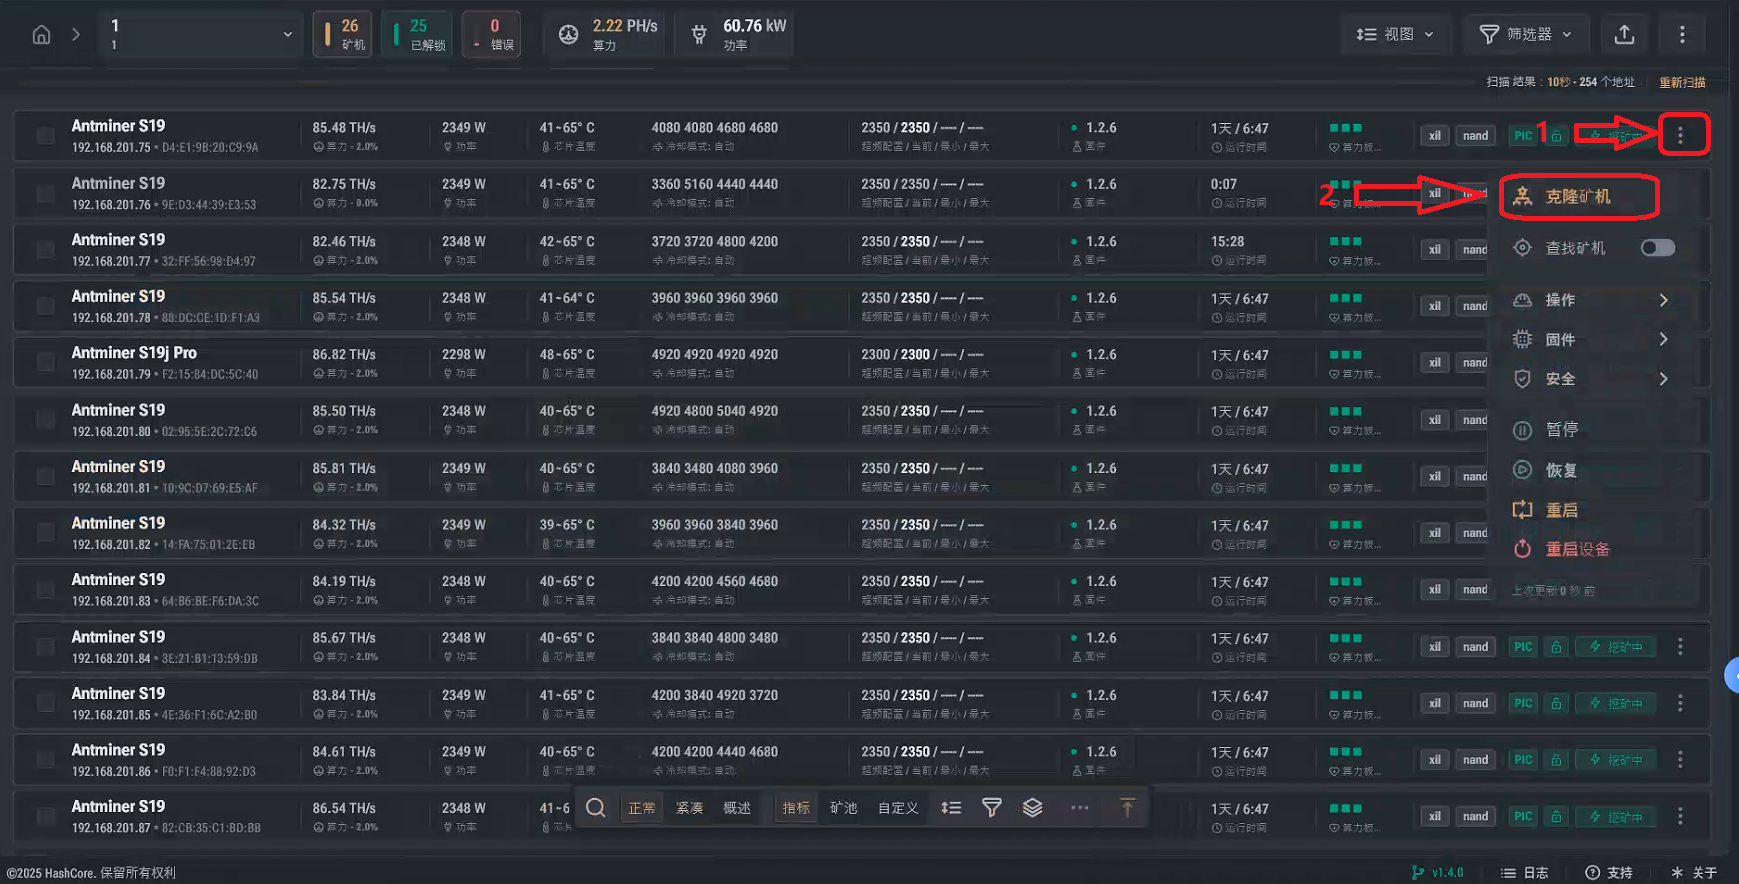
Example of batch cloning miner settings interface
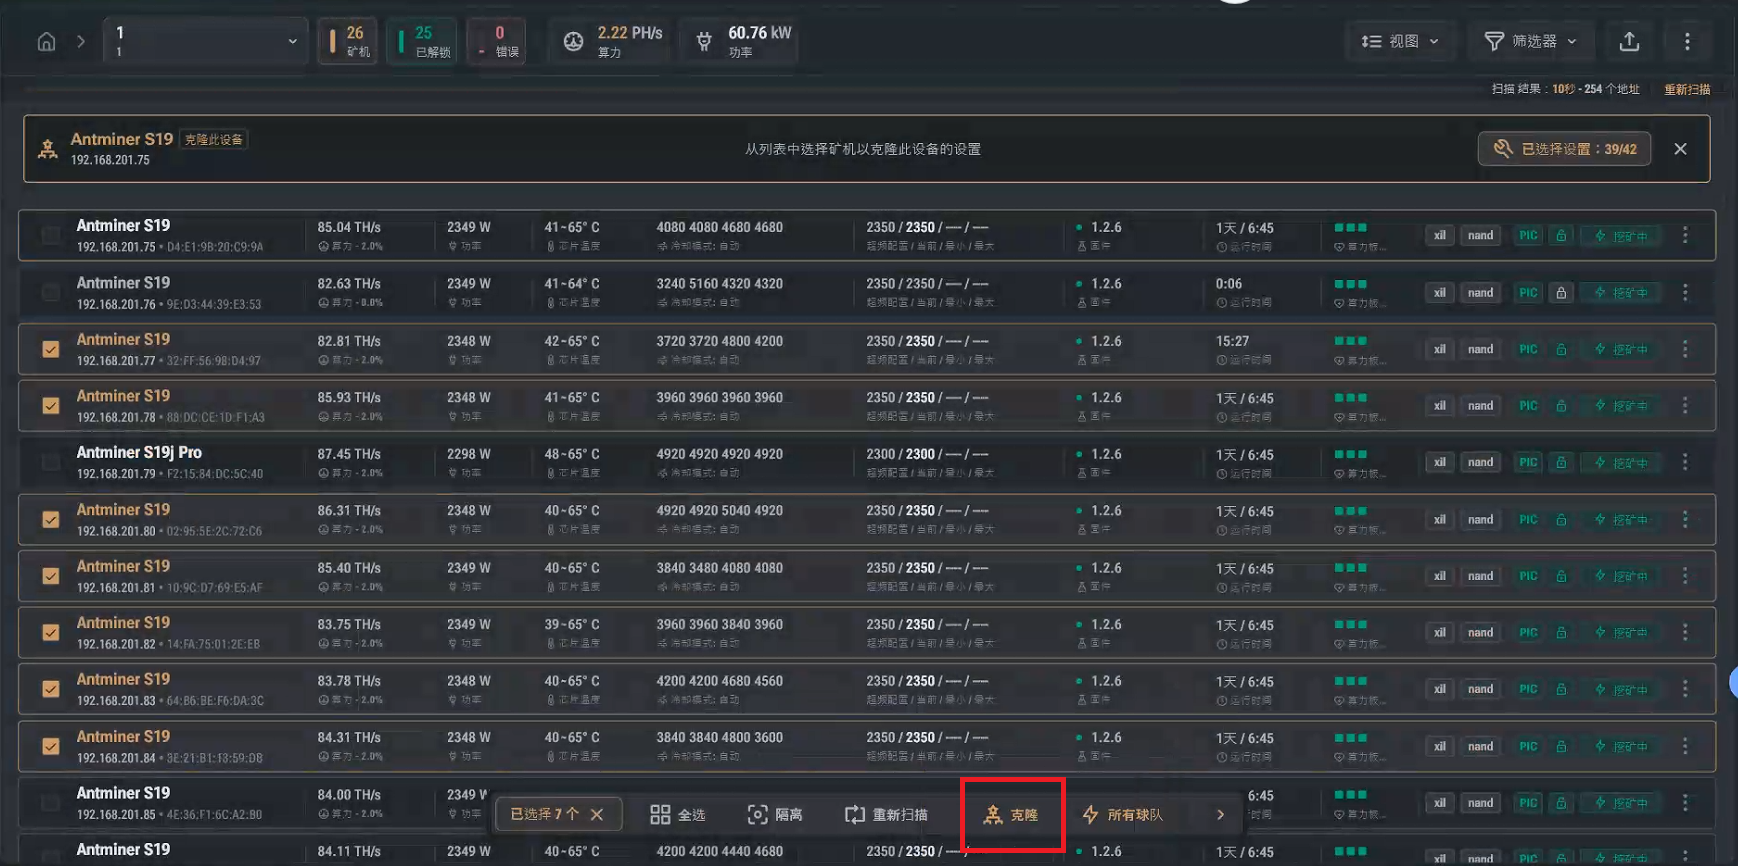
Example of batch cloning miner settings interface
Rollback Firmware Installation Tutorial
-
1
Downgrade or Restore Factory Firmware
1. Select and download the appropriate firmware for your miner. 2. Format the SD card to FAT/FAT32 format. 3. Copy the firmware file from the archive and save it to the SD card. 4. Remove the storage medium from the computer and insert it into the miner while the miner is powered off. 5. Turn on the miner and wait for the green LED to light up, indicating that the operation has been successfully completed. 6. Power off the miner and remove the SD card.
-
2
SD Card Capacity
The maximum capacity of the SD card is 16 GB.
Important Note
- Do not interrupt the installation process by turning off the power or removing the storage device. This may result in the loss of underlying software. In such cases, the control board can only be restored by visiting a service center.
If the version does not change after flashing
- 1. Clean the dust on the SD card slot.
- 2. Try using another storage device
- If the control board has a microUSB port instead of an SD card slot, you must use an OTG adapter and a USB flash drive. The capacity of the USB flash drive must not exceed 8 GB. Be sure to use a USB 2.0 port.